Husqvarna vs Ambrogio
Our story of replacing a Husqvarna 450x with a Ambrogio 4.0

Thinking about buying a Husqvarna robot lawn mower? Find out why we moved to an Ambrogio instead.
If you have a large complex garden and want a durable robot lawn mower from a long standing manufacturer, there is little choice, a Husqvarna or an Ambrogio. The largest Husqvarna (450X) can cope with up to 5000 m², an Ambrogio can cope with up to 20,000 m² have a look at the Ambrogio range.
The article below gives details of our test garden (which probably is as complex as they get), our Husqvarna installation and why we moved to an Ambrogio 4.0.
If you have any questions or need any advice, please Contact Us or leave a comment at the end of the article.
Why did we buy a robot lawn mower?
We moved into our house about 5 years ago. One of the main reasons for moving was to have a bigger garden so our new house came with 4 acres of which 1.5 acres is grass that needs mowing so we bought a sit on mower to augment our petrol mower.
Initially the thought of driving round the garden on the sit on mower listening to music seemed appealing however, the reality turned out to be somewhat different:
- It kept breaking down
- The ground was too soft to mow the grass early in the season
- Mowing for three hours at a time was hot tiring work
- It was noisy
- It kept scalping the grass (some areas are very uneven) etc. etc.
The solution could have been to buy a better sit on mower or pay someone to do it but neither of those options seemed appealing so I started researching robot mowers.
Finding the right robot mower
I couldn’t find any guides which covered robot mowers for large gardens so I started my google search. I discounted most mowers as they could not cope such a large area. In the end, we settled on the largest Husqvarna (the 450X) which was sufficient to mow just the back garden.
Having used a robot mower for a season, we decided to look again at other manufacturers and found Ambrogio which could offer a wider range to cover all the areas of our garden.
We ended up splitting our garden into 3 areas and having a mower in each, the Husqvarna was replaced with an Ambrogio 4.0 Elite – have a look at our test garden for the other areas and mowers.
Installation of the 450X
The 450X was installed on a wet and miserable day by our local Husqvarna dealer. We sited the base station near where we had power and where we thought it would be out of the way (more about that later).
Looking back on this, I would always recommend installing a robot mower on a dry day for a couple reasons:
- The practical reason is that the wire laying machine needs to grip the grass so if the grass is wet, it makes the job harder
- The psychological reason is that you will always make a better job when you are not cold, wet through and trying to catch up time that you’ve lost because of the wire layer slipping.
Installation of the 450X involves:
- Laying the perimeter wire – basically following the red line on the garden plan
- Laying up to 3 guide wires which allow the robot to navigate to the edges of the areas.
About 1km of wire was used in the installation.
Living with the 450X

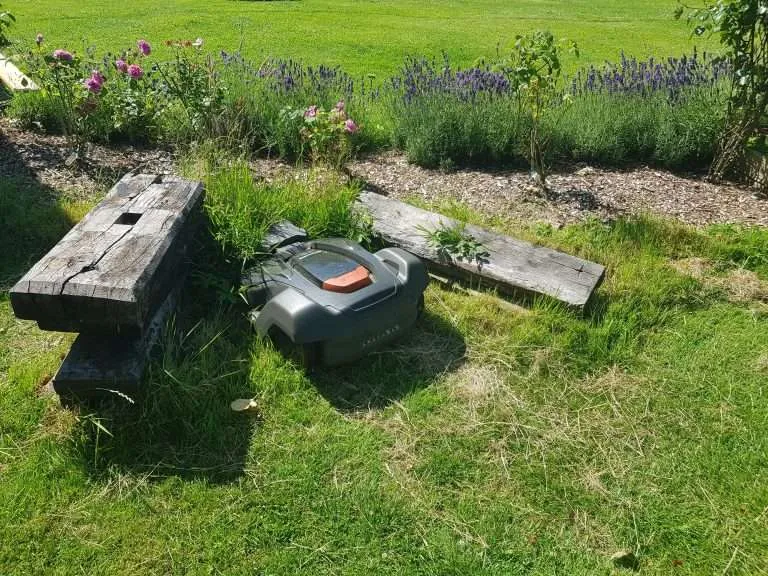
After a few weeks of sorting out rabbit holes, moving wire where it was not quite in the right place and ‘hiding’ it from passing footpath users (hence the sleepers in the photo), things settled down. On the whole it just got on with it’s job, it got stuck every now and then (unfortunately mostly when we were away on holiday). The app tells you where it is stuck, a useful feature, but there is not a lot you can do about it if you are on holiday.
There are just a few ‘niggles’ that we had with it:
- Build quality – the cover feels cheap and marks fairly easily….having said that, it hasn’t caused any issues yet. You can see a video that goes into more detail.
- The unique cutting blades that swivel back when they hit something are good in theory, however it you have branches, fallen apples etc. you sometimes want something that is a bit more aggressive.
- The lack of control that you have on which area it mows. We like the lawn at the back of our house to be the best cut (as we see it all the time) but the schedule does not allow you to control where it goes or be able to send it to another area.
- The wire was still on the surface on the lawn in a number of places. This was due to a mixture of a hurried installation and the very dry summer which meant the grass did not grow over it.
- Wire breaks – at the start of the second season, I set the mower up and found that it there were a number of wire breaks. With about 1km of wire, it takes a while to find them but once I had put joints in all the breaks, it worked fine.
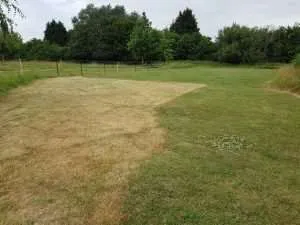
- Tracking issues. When a mower follows the same route time and again, the grass in that area tends to wear more than others and you end up with tracks. We now have areas where the grass is browner as the mower follows a small number of paths when it exits the base station…and when it tries to find the base station. This has been made worse by the dry summer we had last year. See photo.
I thought that the grass would recover but over a year on and after a dry spell, the tracking lines are still visible.
The end of an era – removing the 450X
In some ways the Husqvarna became a victim of it’s own success. We had numerous friends who came over and said that they had never seen a robot mower before or didn’t realise that it could handle large complex gardens.
We started looking at the possibility of setting up a company to sell and install robotic mowers in our local area. Having looked at various makes, we settled on Ambrogio as it offered a larger range of robots than Husqvarna and could cope with much larger lawns. It was also had an expanding dealer network with no coverage in our local area….The Robot Mower was born.
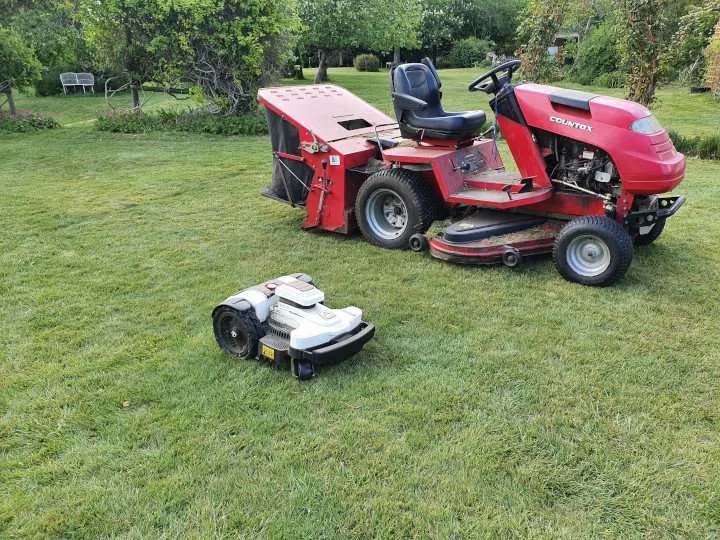
I think that any robot mower dealer should have first hand experience of using them so one of the first jobs was to replace the Husqvarna with an Ambrogio 4.0….it looks like a robot (or a tank at least)!
We spent some time looking at the possibility of running the Ambrogio using the same perimeter wire as the Husqvarna, in the end we decided that it wasn’t the best solution for a number of reasons:
- The Husqvarna perimeter wire is not as thick and resilient as the Ambrogio wire.
- The perimeter wire had not been laid as close to the lawn edge as possible which meant that larger areas had to be strimmed/ cut manually.
- It gave us experience of laying a large amount of wire on a complex lawn using our new wire laying machine.
- It allowed us to use some of the advanced Ambrogio specific techniques to improve the robot navigation/ performance.
Removing the 450X was as simple as disconnecting the base station and removing the visible perimeter and guide wires…or at least we thought. With 1km of burried wire, it’s difficult to find and extract all the wire. One reason why I now take a video following the perimeter wire after an installation making a note of spare wire, joins etc.
Installation of the Ambrogio 4.0
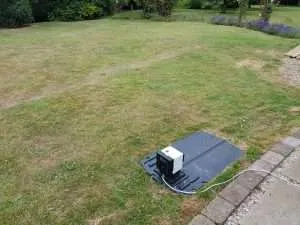
We decided to locate the base station in a different area which offered protection from prying eyes and was located on the lawn that we wanted mowed first.
We decided to tweak to mowing areas:
- We removed an area (Area 7 in Our Garden above) which required us to open a gate to ‘let the mower out’…as we never did this so it was always cut manually. This is now cut using our L35 as a closed area i.e. twice a week we pick up the L35 which mows in area 8, walk 10 meters, drop it in the area 7 – 60 mins later it’s mowed.
- We trimmed edges so that we could lay the wire as close as possible to the edge and hence minimise the manual cutting
- We expanded one area as we thought that the 4.0 would be able to cope with the uneven ground where the 450X had struggled.
The Ambrogio robotic mowers navigate to areas of the lawn in a different way to the Husqvarna. They follow the perimeter wire either clockwise or anti-clockwise for a given distance before starting cutting. This makes it easy to define new areas…you just add them to the app.
In order to minimise tracking issues, Ambrogio have a specific technique that allows the robot to follow the wire but stay a varying distance away (up to 1m.). This works well but requires a bit more planning as if you have a passage less than 1m it could skip it. To get around this issue, you can put in ‘recall to wire’ points to allow the robot to follow the wire through tight spaces/ passageways.
Living with the Ambrogio 4.0
The first issue we hit was that the mower would not come out of the base station correctly…pretty major but after some investigation we found that the signal from our other mower was interfering with it. Swapping the channel that it was transmitting on solved the problem.
The next stage was tweaking the setup to ensure that all the lawn was mowed with as few areas being setup as possible and that we had a few recall to wires as possible. Having not used the recall to wire before and having lots of curves before and after the recall to wire it was a bit of trial and error but I can say that I have now mastered it.
We were a bit worried that we had tried to push the edges a bit too far and that it might not cope with the uneven expanded area but the 4.0 has coped very well, the pivoting body allows it to cover areas that the 450X would not have coped with and the cut is more even than with the 450X. All in all a good start.
What now?
So, we have been running the Ambrogio 4.0 Elite, L35 Deluxe, L60 Elite and Twenty Elite for a while and we are now in a position to compare them.
Read our blog entry A User’s perspective to find out more.
If you have any questions, Contact Us, we’re here to help (as well as sell you the best mower for your garden).